Create a free ticket and our support team will provide you necessary assistance.
Quick Start - Storm Streaming Cloud
In this guide, you will learn everything you need to create your own live video stream using Storm Streaming Cloud and place it on your website, without any prior streaming experience.
Video Tutorial
Choosing the Right Type of Subscription
The first issue we need to consider is choosing the right subscription. Basically, there are three types, each aimed at different customers.
With Transcoding - the option of transcoding involves converting the original stream into versions with lower resolution and bitrate. For people using, for example, mobile devices, a 4K resolution stream may not be the optimal choice. Thanks to the built-in Adaptive Bitrate Streaming (ABR) technology, your viewers will receive a stream best suited to the capabilities of their device and internet connection.
Passthrough-only - this subscription version does not have the option of transcoding. The material you are broadcasting is exactly what your viewers will be watching. In this case, we need to more carefully select the parameters of our video transmission, so that as wide a group of people as possible can use it. The Passthrough subscription, however, has several advantages, the biggest of which are significantly lower generated delays. The cost of such a subscription is also lower.
Restream-only - this is a special type of subscription that was created only for restreaming video broadcasts to popular social networks like Facebook, YouTube, Instagram, TikTok, etc. In this option, we do not have the possibility of embedding a player on our own website, but the cost of the subscription is much lower than the others.
Data Transfer Calculation
In the case of real-time video streaming, one of the most challenging aspects is estimating the data transfer required, which constitutes the largest cost in the transmission process. The easiest approach is to calculate the transfer consumption per viewer-hour. This, of course, depends on the chosen resolution, but the following table will assist us in this:
| Resolution | Frames per seconds (FPS) | Bitrate | Average GB/h |
|---|---|---|---|
| 1080p | 60 | 4500-6000 | 2.57 |
| 1080p | 30 | 3500-6000 | 1.93 |
| 720p | 60 | 2500-5000 | 1.93 |
| 720p | 30 | 1500-4000 | 1.29 |
Based on the provided table, we can deduce that a single viewer, while streaming at a resolution of 1920x1080 (Full HD) and 30 frames per second, will consume approximately 1.93 GB of data per hour.
However, if the same user is using a mobile device and we deliver the stream at a lower resolution of 1280x720 (HD Ready) and 30 frames per second, the data consumption will be approximately 1.29 GB.
Assuming that 70% of Internet users primarily use their phones, our hourly transmission for 100 users will consume approximately:
1,93 GiB (1080p stream) × 30 (desktop/smart TV users) = 57,9 GiB
90,3 GiB (720p streams) + 57,9 GiB (1080p streams) = 148,2 GiB (total usage)
Try Storm Streaming Cloud
At this stage, let's assume that you have already selected and paid for a subscription and you're ready to start your first streaming session. However, if you're still unsure if Storm Streaming Cloud is the right choice for you, you can take advantage of our trial version of the subscription. It's completely free, and you don't need to provide your credit card number. After the trial period ends, you are not obligated to commit to anything.
Creating Your First Stream
-
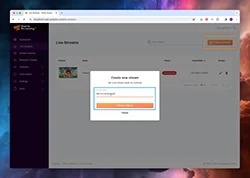
Go to the "Live Streams" tab in the Storm Streaming Cloud panel. Here, you can view all your
currently active streams. In the top-left corner, select the "Create Stream" option, provide
a name for your stream, and click "Create". The stream name serves as the title, so it's
best to use something short yet descriptive of the upcoming transmission.
-
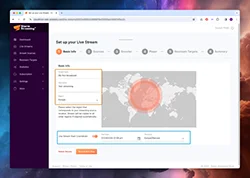
We are now at the first stage of stream configuration. You can further modify the Stream
name and provide a description for your transmission. Below that, choose the region that
corresponds to the location from which you will be streaming.
You can also select the "Live Stream Start Countdown" option, which allows you to schedule the stream for a specific date and count down to it for your viewers. In this case, apart from the date, you need to define the time zone for which you want to set up your stream.
-
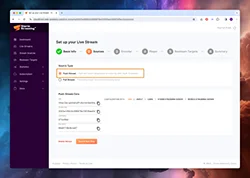
The second step is "Sources". Here, you need to define how you will deliver the video stream
to the Storm Streaming Server. Essentially, you have two options:
- Push Stream: This option is used when you connect to the Cloud servers using external software like Open Broadcaster or XSplit Broadcaster, and you push your stream to them (in 99% of cases).
- Pull Stream: If the stream is already published on an external RTMP server with a public IP address, Storm Cloud can copy it from there.
If you choose the Push Stream option, you will be provided with the connection details to the Cloud server. For the Pull Stream option, you will need to provide the RTMP address from which Storm Cloud will attempt to retrieve the transmission.
-
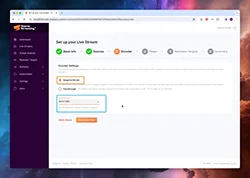
The fourth step is selecting the Encoder options. If your subscription includes transcoding
capabilities, you can choose between Adaptive Bitrate or Passthrough if you don't want to
process your stream. In the first case, you also need to declare the resolution at which you
will be broadcasting your stream.
-
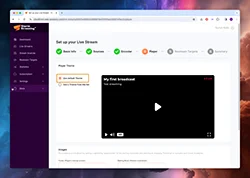
At this stage, you can configure the appearance of your Video Player. Storm Streaming Cloud
has a dedicated video player with various configuration options. By selecting the "Use a
Theme from the list" option, you can create and choose a graphical theme for your player.
This allows you to seamlessly integrate it with the appearance and style of your own
website.
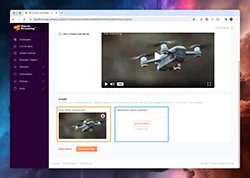
You can also add an image (thumbnail) and a SlashScreen, which will be visible during the countdown to the start of the transmission.
-
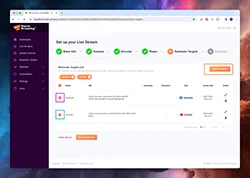
The second-to-last step is selecting the Restream options. If you have prepared these in
advance, you can activate them to begin automatic streaming to your chosen social networks.
-
Finally, review all the settings on the "Summary" subpage, and when ready, click "Finish" to
confirm the creation of your stream. It is also recommended to copy the stream data for
configuring your streaming software.
We have also prepared a detailed tutorial on how to connect to Storm Streaming Cloud using Open Broadcaster and correctly configure encoder settings:
- Ingesting stream to Storm Streaming Cloud with OpenBroadcaster
-
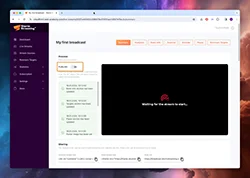
In the last step, you can publish the stream by using the switch next to the "Publish"
option. You can also copy the code to embed the player on your website or download the link
to the dedicated page with the player on Storm Streaming Cloud.
More About Player Configuration
To learn more about the configuration and customization options for players, you can explore our Storm Player Suite - JavaScript section. We have also prepared a guide on how to use JW Player with our Cloud service and server. Similarly, we have prepared a guide for FlowPlayer and VideoJS as well. These guides will provide you with instructions on how to integrate and utilize these players with our service.